Homelab on the Cheap
Recently I decided to build myself a homelab, based around some of the hardware I had lying around, or even currently in use on my home network.
Hardware
Unlike most homelab setups you may have seen on Youtube or Reddit, mine does not feature any fancy rack mounted hardware. I recently had an opportunity to pick up a stack of Dell PowerEdge servers from an office liquidation but:
- I have no space for a full sized rack
- Rack mounted servers are loud and run hot
So unfortunately my network runs on pitiful, mini sized hardware that can be shoved into a closet, or under a desk.
I do remember visiting a buddy of mine years ago, and being shown a fully populated server rack residing in his basement. The guy had legit Sun Spark servers there. The decibels that old rack was generating probably permanently damaged my hearin, but to this day I am envious. My stupid basement loves to flood and get damp and mouldy so I can’t really keep any electronics there.
Optiplex 7010 Micro
I was lucky enough to have two Dell Optiplex 7010 Micro devices lying around. One of them was intended to be a desktop that never got put into use, while other was briefly running Debian and a custom a service on my network that I no longer needed.
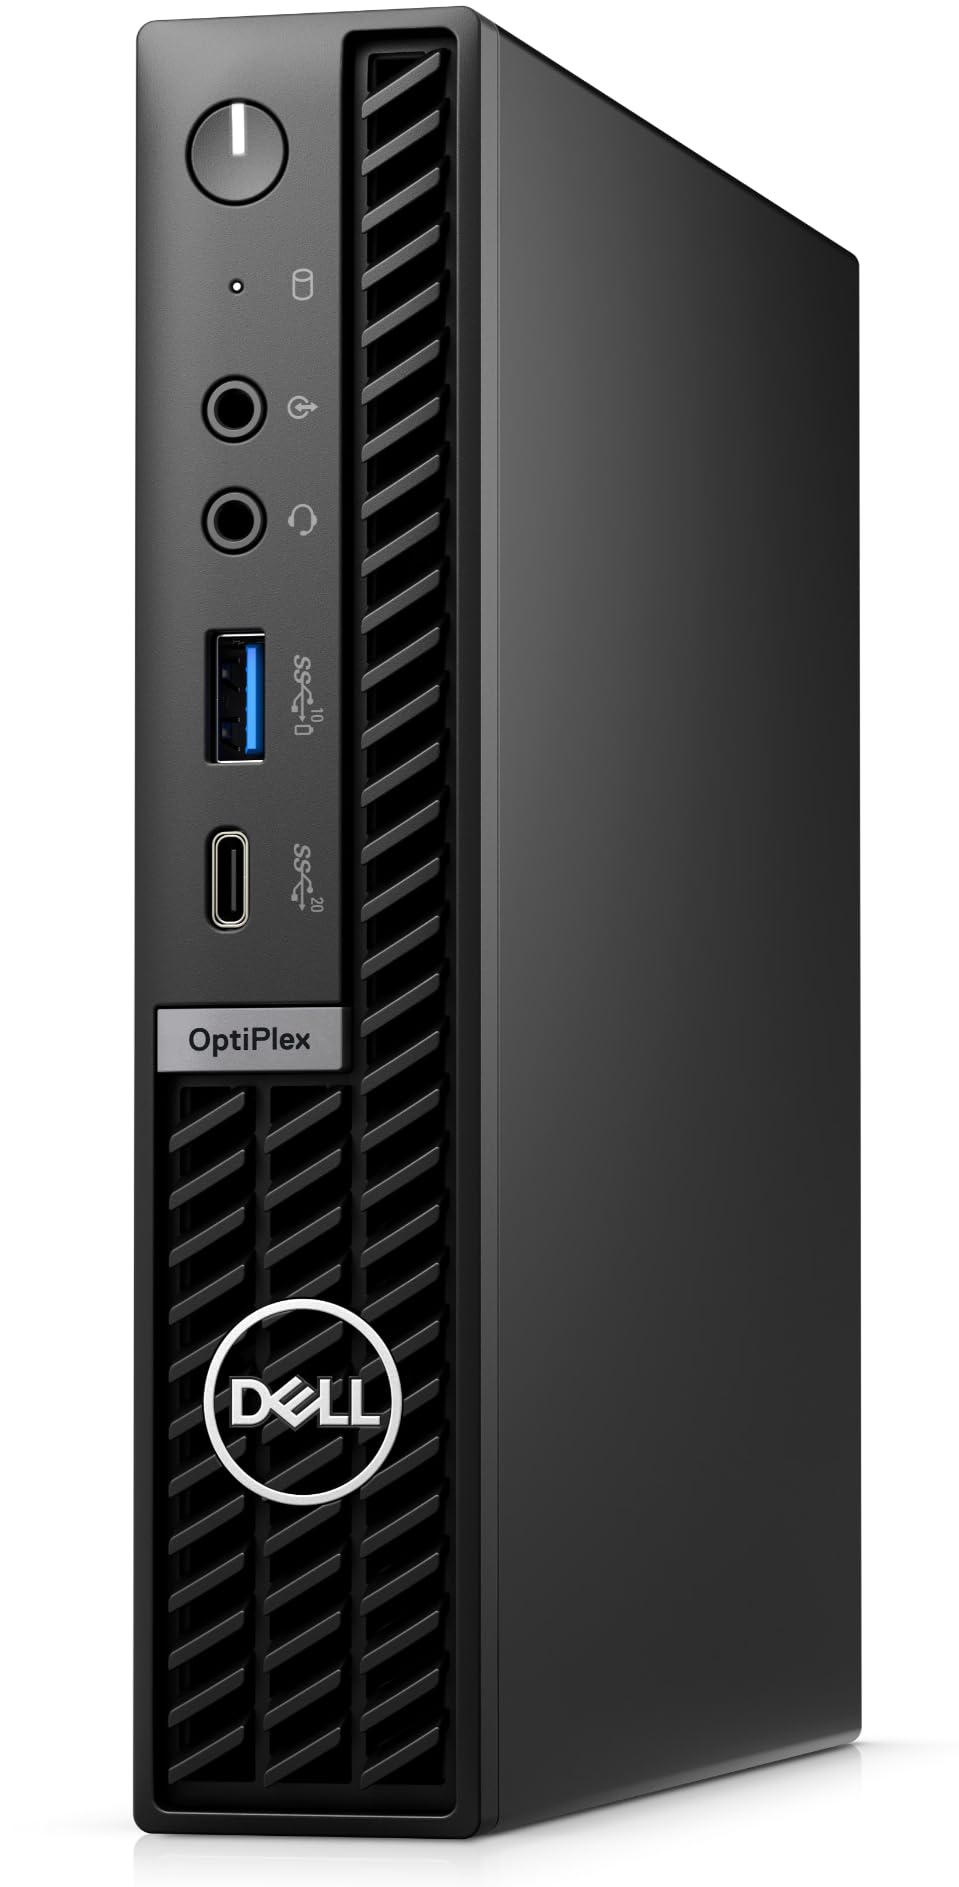
These two mid range desktop devices and they are the “powerhouse servers” of my home network so to speak. They have relatively modern hardware including somewhat recent (and by recent I mean non-ancient) Intel i5-13500T processors and support both nvma and 2.5” SSDs at the same time and are capable or running VM’s or Docker containers with relatively ok performance.
Unlike most other things running on my network, these devices cost real money, and are capable of running Windows 11 and a modern software stack so this is nothing to sneeze at.
The ones I had laying around had pitifully little memory and tiny 256GB drives, so before I did anything else I upgraded them with more memory and extra storage:
The 2.5” SATA port on the motherboard is great as it lets you stick a huge, yet inexpensive SSD in there, while maintaining a speedy and small nvma/M.2 boot disk.
The first and older of the Optiplex machines even had a neat little mounting tray for the 2.5” drive which was a really nice touch even though that drive was never populated while it was in service.
Unfortunately the newer device did not have that tray, which was really disappointing. I guess that Dell eventually decided to cut the cost and stop putting it in these devices as they were rarely if ever used.
HP EliteDesk 800 G3 Mini
I picked this device up on Ebay for $30. I was pretty sure it was busted, but at that price point it was hard to resist. It came with no hard drive or memory, but my intent was to replace those anyway so it didn’t bother me. The seller did include the power adapter which is rare for this type of Ebay firesale deals.
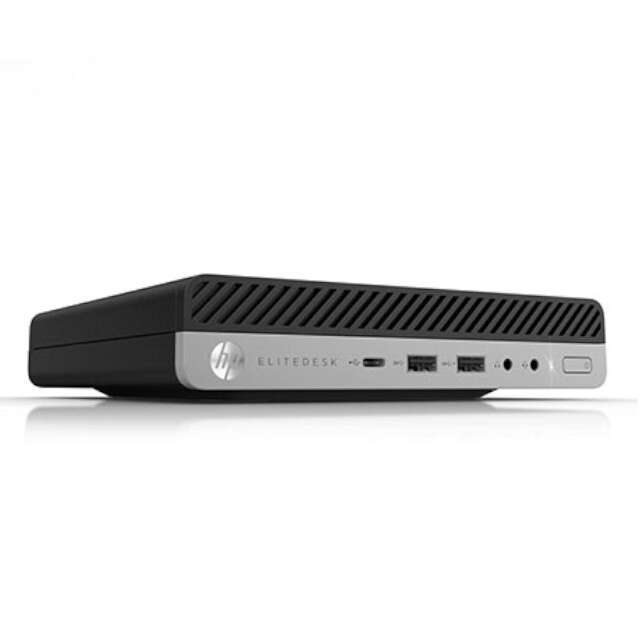
To my dismay, once I popped in some memory and powered it up, the device posted just fine and passed all the HP hardware diagnostics with flying colors.
As with the Optiplexes, I decided to upgrade the memory and storage:
This is an old desktop. You can tell it’s not new because it has a VGA video out on the back. You can tell it’s not that old, because it also has DisplayPort and HDMI next to it. So it’s in that mid-to-old range.
It is rocking a Intel i5-6500T processor, which is nowhere near my Optiplex devices but not complete bottom of the barrel either. Trust, me it gets worse from here.
Beelink T4 Pro Mini
I have two of these throw away, disposable mini PC’s you can buy for under $100 on Amazon, brand new. They rock the absolutely abysmal Intel Celeron N3350 processor. I did not even know they were still making Celerons, but apparently they do.
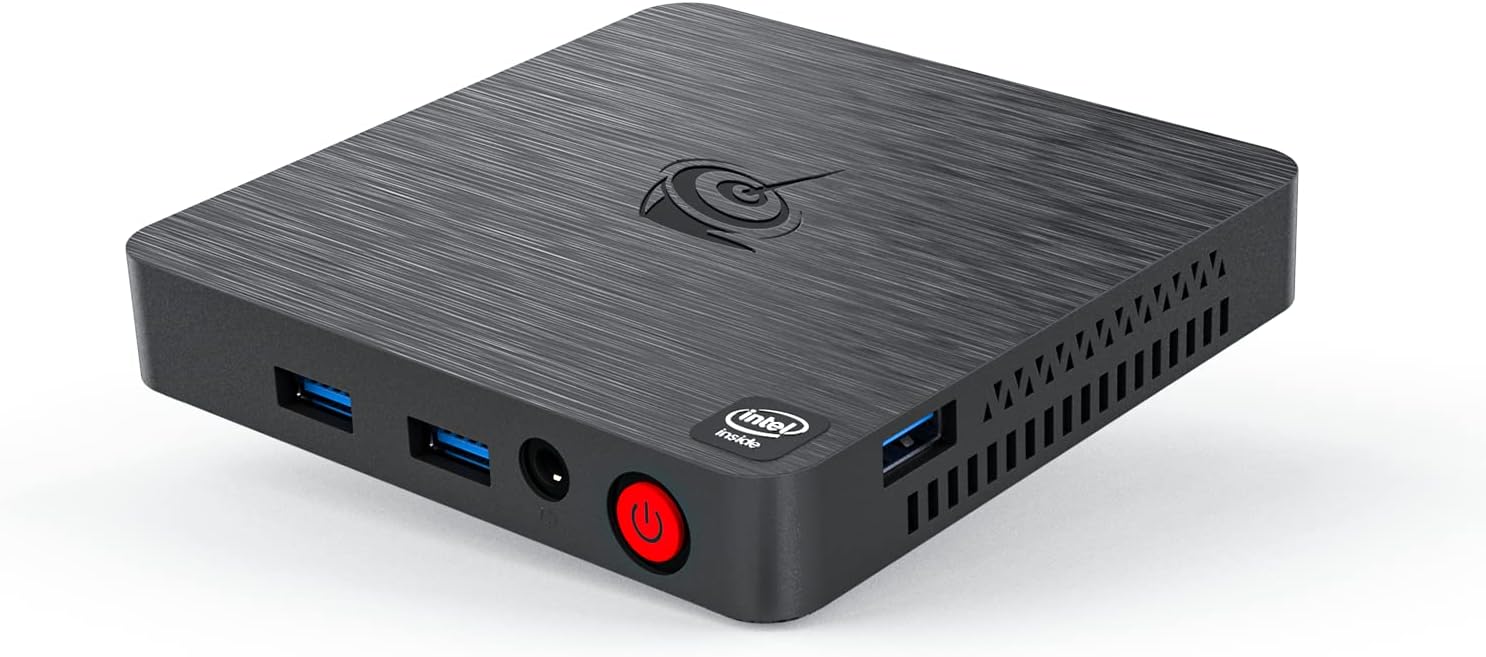
I originally bought them to “make dumb tv smart” and allow my dad to watch his shady bootleg streaming sites on the living room TV. The performance was so awful that they ended up back with me, and my dad got a nice new Dell Optiplex device instead.
But since I have these things lying around, they have been put to work in replacing a very old RaspberryPi that recently died without warning. Likely due to lack of proper cooling which I failed to provide. At least these are said to have some passive coooling, and so far have survived several months of 24/7 operation without any issues.
QNAP TS-230
Since you are required by law to have a NAS in your homelab, I went with this one:
It’s a 2-bay NAS with a 1.5GHz quad core ARM processor, 2GB of RAM that ships with no drives. I shoved 2 Seagate IronWolfs in thereset up as Raid 1:
It’s a neat, inobsequous box that does not take up much space and runs pretty quiet despite the spinning drives and an internal fan:

Why Qnap? Because it’s something I know. I used to run a big boy TS-873U-RP at work and was pretty satisfied with it. I know the software, and I know it does what I need it to do which is: NFS, and lightweight web based file sharing service.
The sub $200 price tag made this unit pretty attractive. I have been running it for several years now without any issues. Every once in a while it updates itself with new firmware without bricking and keeps on chugging along.
Netgear GS324
Since I was going to be running a bunch of “server-like” devices on my network, I needed a way to plug them all in. I went with the Netgear GS324 to replace a handful of smaller 4 and 8 port Netgear switches I have been using.

Ok, so replace is a bit of a strong word. I really intended to replace them, but I was thwarted by my meticulous “rats nest style of cable management”.
You see, at one point, upon moving to my new place I decided to do a proper cable management job. I bought a bunch of zip ties, and I used them liberally to gather all the cabling into neat little bundles and rout them behind furniture and out of the way. The result was immaculate and clean cabling that was almost invisible to the naked eye. I was really proud of it for almost an entire week, until I had to switch out one cable and realized I made a grave mistake.
My liberal use of zip ties, and meticulous routing made it virtually impossible to replace any of the cables without doign a lot of careful cutting and moving furniture. So I just gave up, and just ran cables as needed, letting them get entangled on each other without much thought.
When it came time to replace the old switches, it became abundantly clear this was going to be a multi-day cleanup job. So only some of the cables (most recent aditions) got migrated to the new switch, and the rest of the network persist as is, until I have nough willpower to cut 600 zip ties, and spend 800 hours un-tangling a cat-6 jungle.
Software
Now that we discussed the “server” hardware, lets talk about what is going to be running on these machines.
Operating System
All these devices need to run some sort of OS on the bare metal. I probably should have paid more attention to this choice, but for me it was almost automatic. I installed Debian Linux on almost every single one of them without thinking. Debian is just what I know. I have been using Debian and Debian based distros for over 20 years no both professionally as well as privately.

This actually reminds me of a conversation I had with a collogue many years ago. Somehow I let it slip that I was running a Debian server in production, and he looked at me with a mixture of shock and disgust.
He was like “How do you get support service for that?”
Must be nice to have OS support budget. We were not an enterprise level operation at that time.
Since then I got more hands on experience with RHEL, but if don’t have enterprise budget I’m not running a poor man’s RHEL derevative on my home servers. I’ll go with something I know, or something that can give me some sort of performance edge.
Case in point I am considering Alpine Linux for the really low end devices. That whole deal is wild. Basing a distro around busybox and compiling apps with memory protection is something really clever and squeezing base install into 64MB is just mind blowing. I’m running an instance of it on Proxmox right now, and so far it has never cracked more than 200MB of memory usage during regular basic operation.
But that’s neither here nor there. Right now all the devices are running Debian.
My requirements for the native OS on these devices are pretty simple:
mDNS Support
All devices must support ZeroConf and mDNS so that I can address them using the hostname.local style addresses. This is an absolute must and I refuse to go without it. Fortunately, it’s pretty easy to set this up on most distros.
On Debian you just install the avahi-daemon package and you are ready to go:
sudo apt install avahi-daemon
Ironically, the only distro I have ever had issues with mDNS support was Alpine. And it’s not because it does not work. It’s just because it is a pain to set it up.
Installing the Avahi package via apk gets you about half way. It allows your alpine box advertise itself on your network, making it accessible via the .local address. If you want to do mDNS lookups however, you have to run an entire local DNS server.
NFS Support
This is more about the NAS choice than anything else. I know that Qnap supports NFS out of the box and without any fuss. I also know that it supports SMB the same way. I know that the same folder on the NAS can be shared in multiple ways at the same time without any clashes. This means that my Linux devices can co-exist with end-user Windows machines without problems.
What I would like to experiment with in the future is using NFS mounted home drives. I remember seeing this implemented back in my university days and thinking it was brilliant. I could sit at any Sun SPARK workstation on campus, log in and have my profile loaded over the network. Or I could ssh into any server on the university network, and have access to my home directory, scripts and settings.
I know this is doable on Linux, and from what I read it’s not even particularly hard. I just don’t know how stable it is. It is definitely something I want to play with in the near future.
Virtualisation Support
I knew that whatever I put on the Optiplex devices will have to be able to run VM’s. One of them has been predestined for Proxmox, while the other was going to have to become a Docker workhorse.
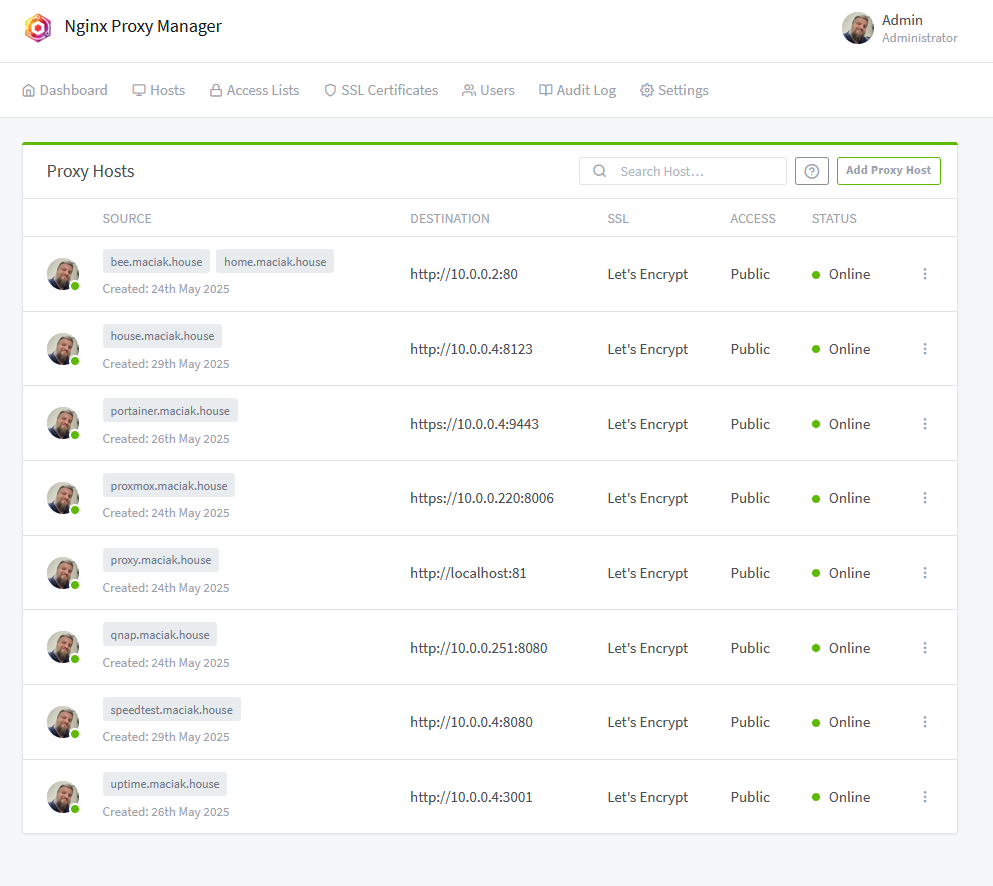
Ngnix Proxy Manager
The Nginx Proxy Manager is the backbone of any homelab.
All the different self hosting services you are going to be utilizing run on weird ports, and none of them support SSL out of the box. The proxy manager can be set up to sit in front of them, and provide easy to remember addresses and add encryption on top.
For example, would you rather access your Portainer instance like this:
http://docker-server.local:9443/
Or like this:
https://portainer.my.house
Ngnix Proxy Manager allows you to do just that. Configure easy to remember URLs for all your services, and hide that pesky “Connection Insecure” warning your browser likes to display.
The way I set things up, is not necessarily the way I would recommend doing it.
I have a confession to make: I did this did this the wrong way. I registered a public domain name mylastnam.house and then pointed it at 10.0.0.2 which is the local IP address of my Ngnix Proxy Manager. In a civilized society, you are not supposed to do that. Not only is it insecure (I am revealing to the whole world the IP address on my local network) but also a little bit naughty and frowned upon. It is not a best practice. In fact it could probably be categoraized as the worst practice.
But I did it. There is no law that says a dog can’t play basketball, and that an A record can’t point to a local, non-routable IP address. It’s pefectly legal, and Cloudflare let me do it. So if you want to yell at someone, yell at them.
Why would you do such a thing, you may ask? Trust me, there is method to my madness. My ISP is Comcast, and I have an Xfinity gateway, infamous for the fact that it does not allow you to change your DNS server.
The correct way of doing this, is to run your own DNS server locally, and have that handle the addressing. But I literally can’t. And before you tell me to switch out the gateway, let me say this: I don’t live alone. There is a legitimate family use case for us to run the Xfinity gateway that can be managed by any adult in the household via the iPhone app for the purpose of parental controls and managing network access.
I’m currently running the Ngnix Proxy Manager as a docker image on the HP machine. Despite it being an older device, I have not noticed any performance issues.
Tailscale
The beauty of the self hosted local services is that they are local. You don’t have to worry as much about security, since they are not exposed to the internet. This is also their big downside. Sometimes, you want to access something on your local network while away from home. And the worst thing you can do is to punch a hole in your firewall and set up port forwarding.
This is not the way. This is why we invented VPNs.
Tailscale is not your traditional VPN. It is a really clever solution allows you to easily create a mesh VPN network between all your devices. You install the client on each one, and they can magically communicate regardless of where they are in the world.
Need two devices to talk to each other? Put a client on each, and they can address each other by hostname alone.
The killer feature of Tailscale however is the Subnet Routing. It allows you to designate a device running a Tailscale client on your network as a “subnet router” and expose some part of your network to all the other tailscale clients joined to your VPN network.
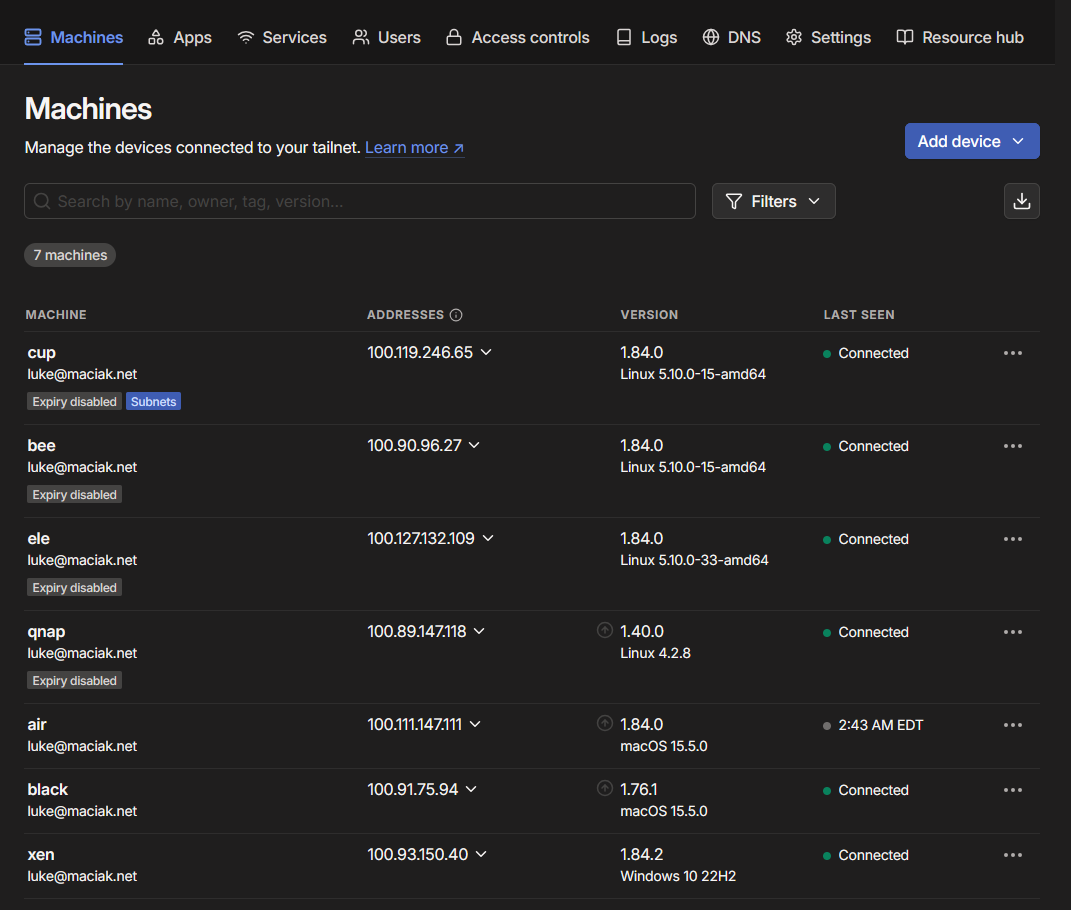
You of course get fine grained access controls as to who gets access to what that can be defined in the Tailnet admin console. For me, my tailnet network consist of me, myself and I, so I don’t really have to worry about any of that.
I recently had travel for work, and I was able to print to my local home printer, over Tailscale subnet routing from a hotel Wi-Fi so I can confirm this solution works as advertised and is fantastic.
I have a subnet router running on the same HP machine that is currently serving as the Nginx Proxy Manager and it is handling the load without any issues.
The Hub
Every local homelab network needs a main hub site that provides easily accessible links to all the local services. There are many different solutions that automate this process. I see people install various “dashboard” type docker apps, and argue over which one is the best.
I rolled my own:

I installed Apache on one of the Beelink shit-boxes and made it serve a static HTML page with a bunch of links. That’s it.
My dashboard is hand made, artisanal HTML. I don’t really need anything beyond that.
Anyone on my home network can browse to home.maciak.house from any device and hit that page.
FileStation
Keen eyed readers might have noticed that I have a bunch of “folder” links on my hub page. These are FileStation links.
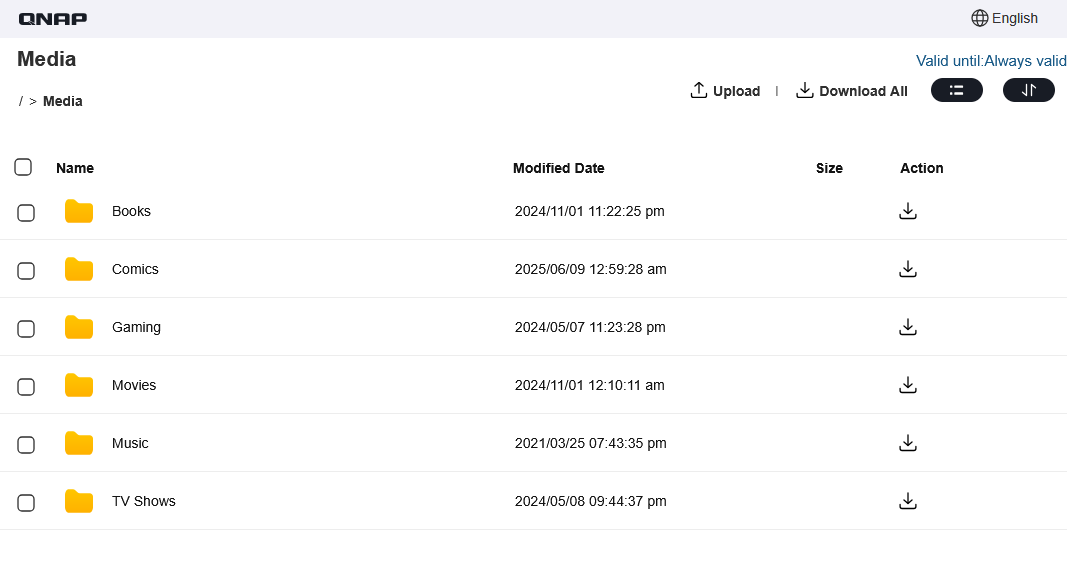
FileStation is the native web based file sharing solution that comes pre-baked into Qnap-OS. It allows you to share NAS folders via a URL and provides a simple but functional web interface for viewing, downloading and uploading (if allowed).
The links can be password protected, or made to expire after a specific amount of time. They can be permanent, and can allow uploading if needed.
The upload functionality is somewhat limited as it does not allow users to create folders, move files or delete uploaded data. Since I’m mostly using these in Read-Only mode to share some media over the local network, this is not a problem form me.
Proxmox
One thing that everyone deserves to have on their home network is a hypervisor.
Proxmox is a Debian based linux hypervisor with a robust web UI that allows you to sping up VM’s in seconds.

I have dedicated one of the Optiplex devices to be my Proxmox server. As you can see I have mostly been using it to test and tinker with things.
If I may direct your attention to the screenshot, you will see that, I have successfully installed Arch, by the way. Please clap.
Or maybe don’t clap. I must admit that I massively failed when I tried to give Gentoo a go. In comparison, Arch was a piece of cake.
I’m not currently running anything essential on that server, but that does not mean that you can’t run a full serious server on there. Right now I am happy to just be able to spin up VM’s at a moment’s notice and then break them in horrible ways without giving a single shit.
Portainer
My second Optiplex device has been sacrificed at the altar of Docker. It is a dedicated Docker server where I run most Docker related things, as that device has the most CPU cores to spare.
While I am comfortable enough spinning up Docker containers from the command line, or using compose files, I am running a Portainer instance for visibility.
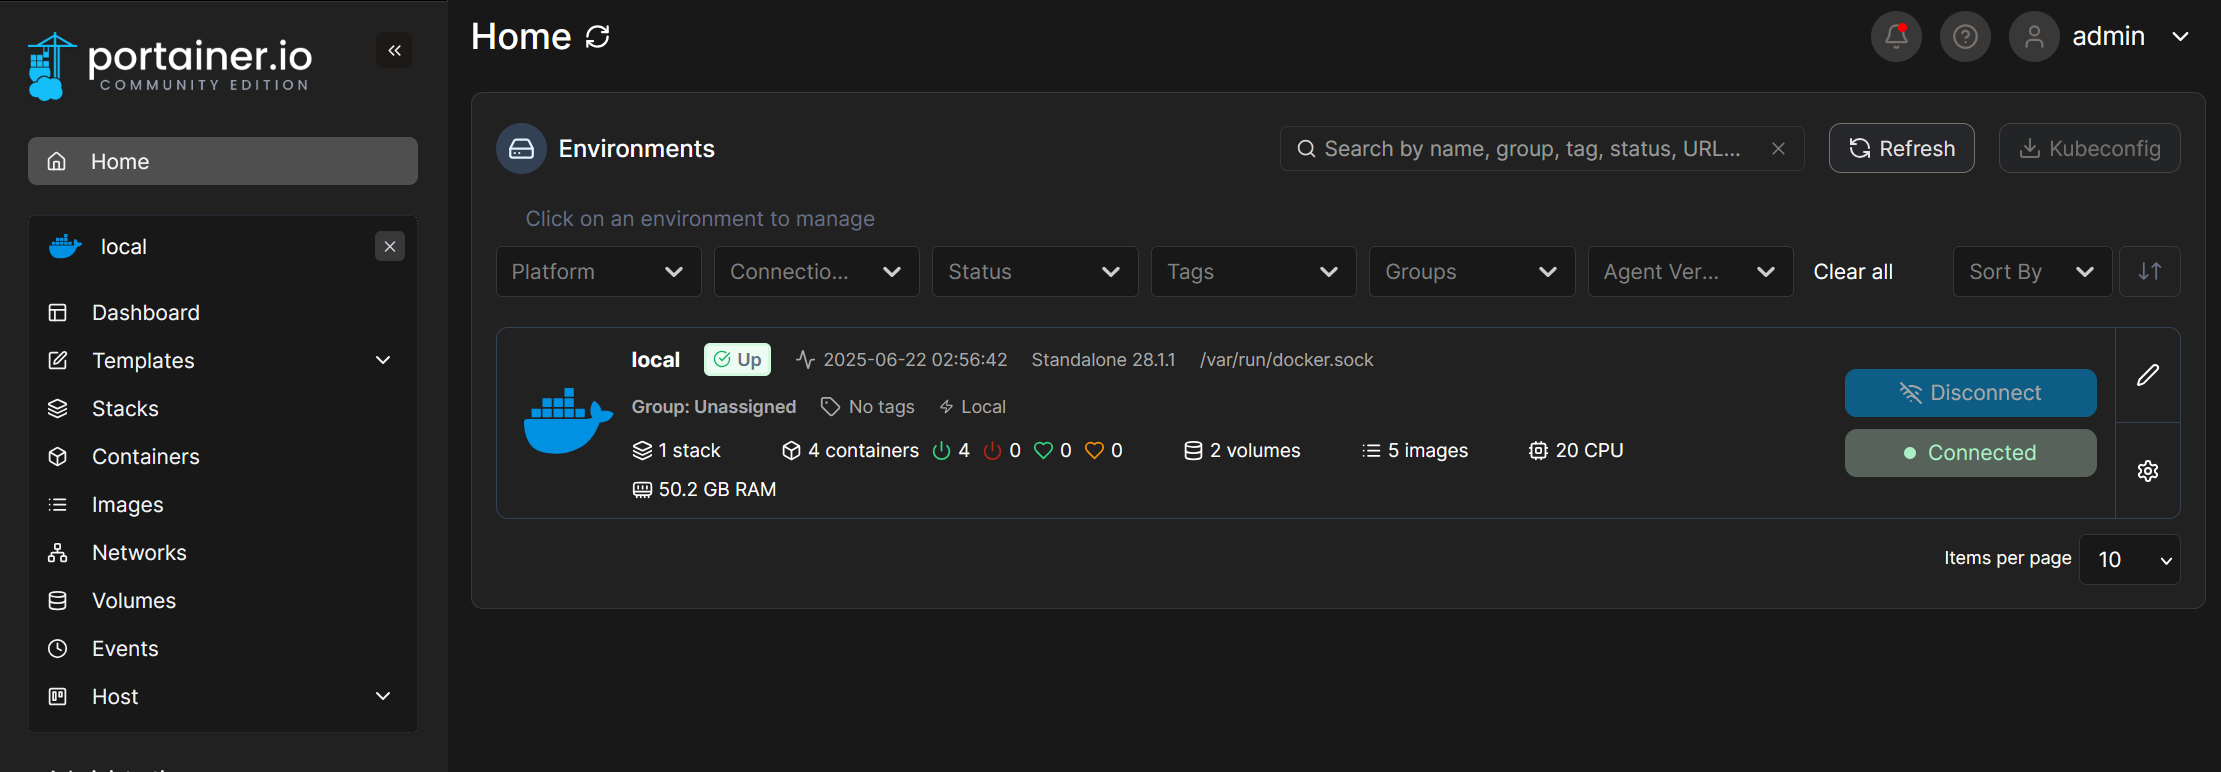
My main use case for Portainer (the web UI for docker management) is monitoring. I want to be able to see at a glance what containers am I currently running, check their status, and be able to stop or re-start them as needed. Portainer fills this function adequately.
Kuma Uptime
Back in a previous life I used to use FreshPing.io service to monitor a dozen or so servers and automatically update StatusPage.io if any of them went down.
Kuma Update gives me that exact functionality on the local network.

I have Kuma running as a Docker container on my Docker Server and set it up to ping my local machines every once in a while and record the results. This allows me to see if all my devices are up, and get an alert if any of them unexpectedly goes down.
CUPS Server
I have two printers in the house. One is fairly new, and it supports AirPrint protocol natively. Anyone in my house can print to it from their iPhone.
The other printer is fairly old, and while it is a fully fledged network printer it does not support AirPrint at all. That said it is the more accessible one, so I do want people to be able to print to it from their mobile devices.
Solution? CUPS server.
CUPS supports AirPrint natively. So to get a non-AirPrint printer to work with iPhones, you just need to set up a CUPS server and add your printer to it.
On Debian this is fairly easy. First install the server:
sudo apt install cups
Then enable remote administration:
sudo cupsctl --remote-admin --remote-any --share-printers
Finally, add yourself to the lpadmin group:
sudo usermod -aG lpadmin username
The server runs or port 631 but you can use Nginx Proxy Manager to give it a more friendly URL. Log in, add your legacy printer, and you are ready to go.
I threw this service on my remaining BeeLink device. It is now a dedicated CUPS server.
Speedtest Tracker
The Speedtest Tracker does exactly what it says on the tin: it tests your internet speed and tracks it over time.
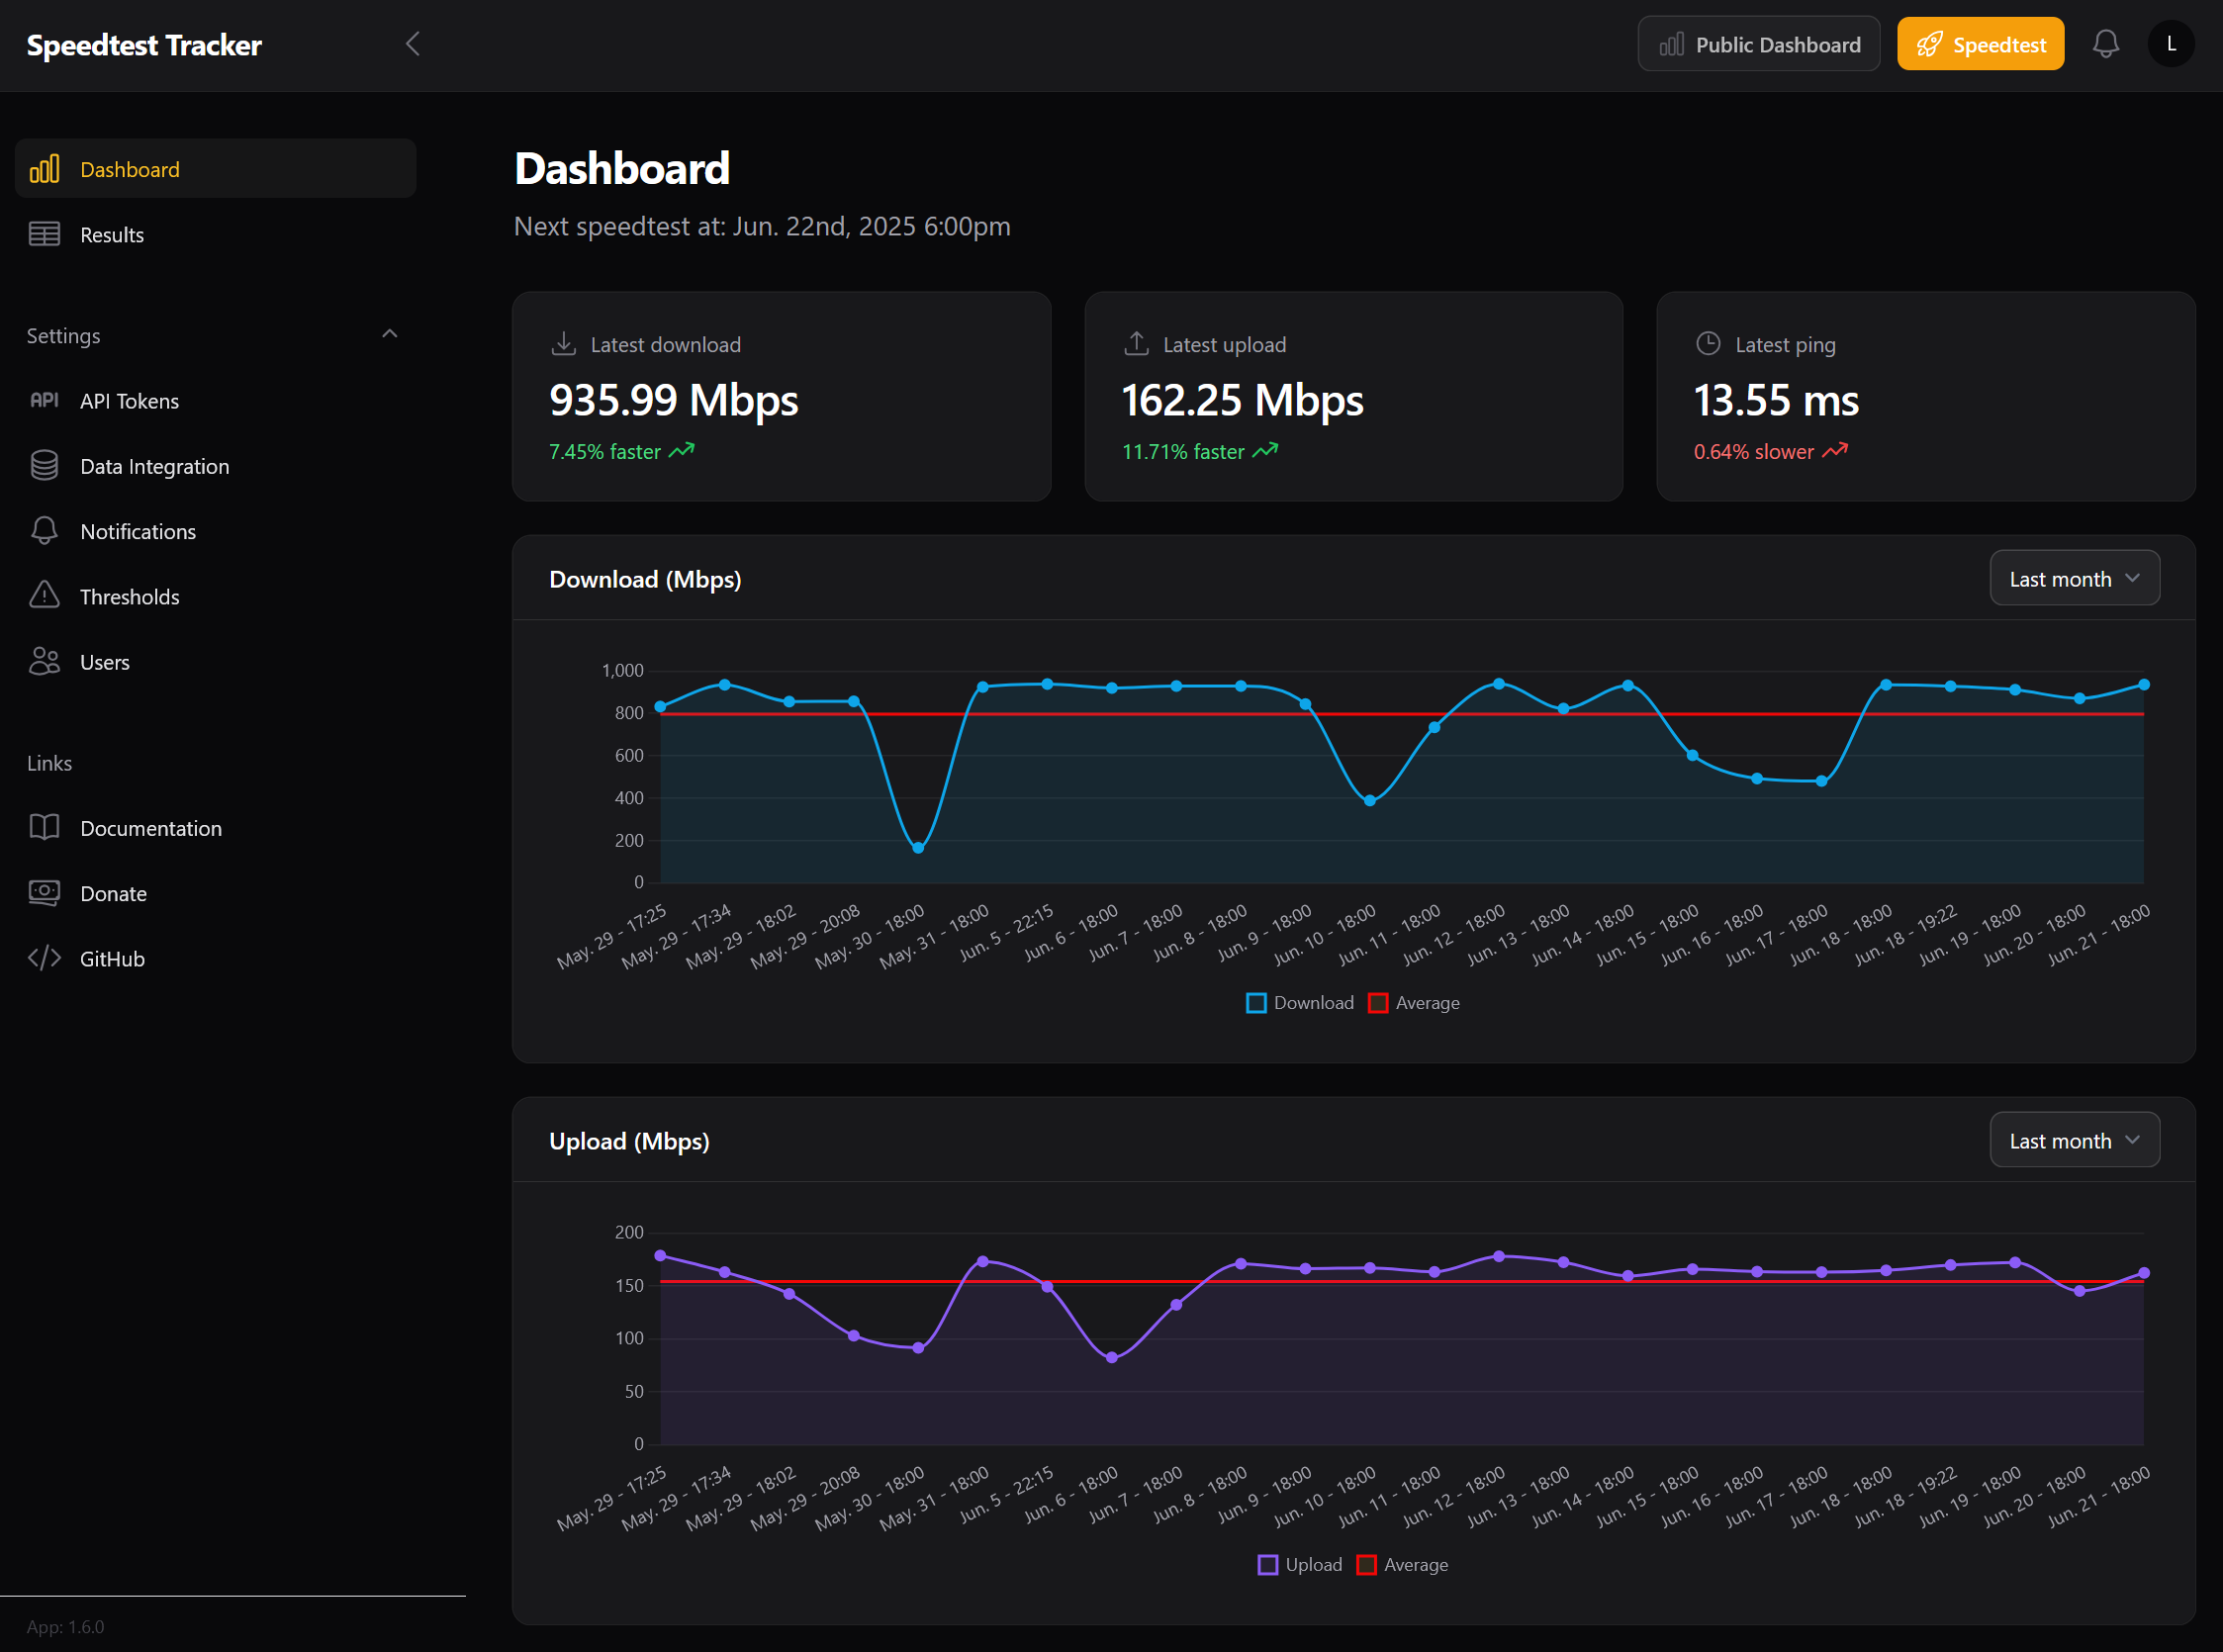
This service runs as another Docker container. While not essential, I enjoy having it ans it shows me how my internet speed varies over time. I currently set it up to run once a day, but it can be made to span it’s scans as frequently as you desire.
Plex
Plex is a media server you can use to stream your legally obtained or self recorded media to your network. As you can see, I am using it to share out recordings of my D&D sessions, board game nights and League of Legends games and nothing else:
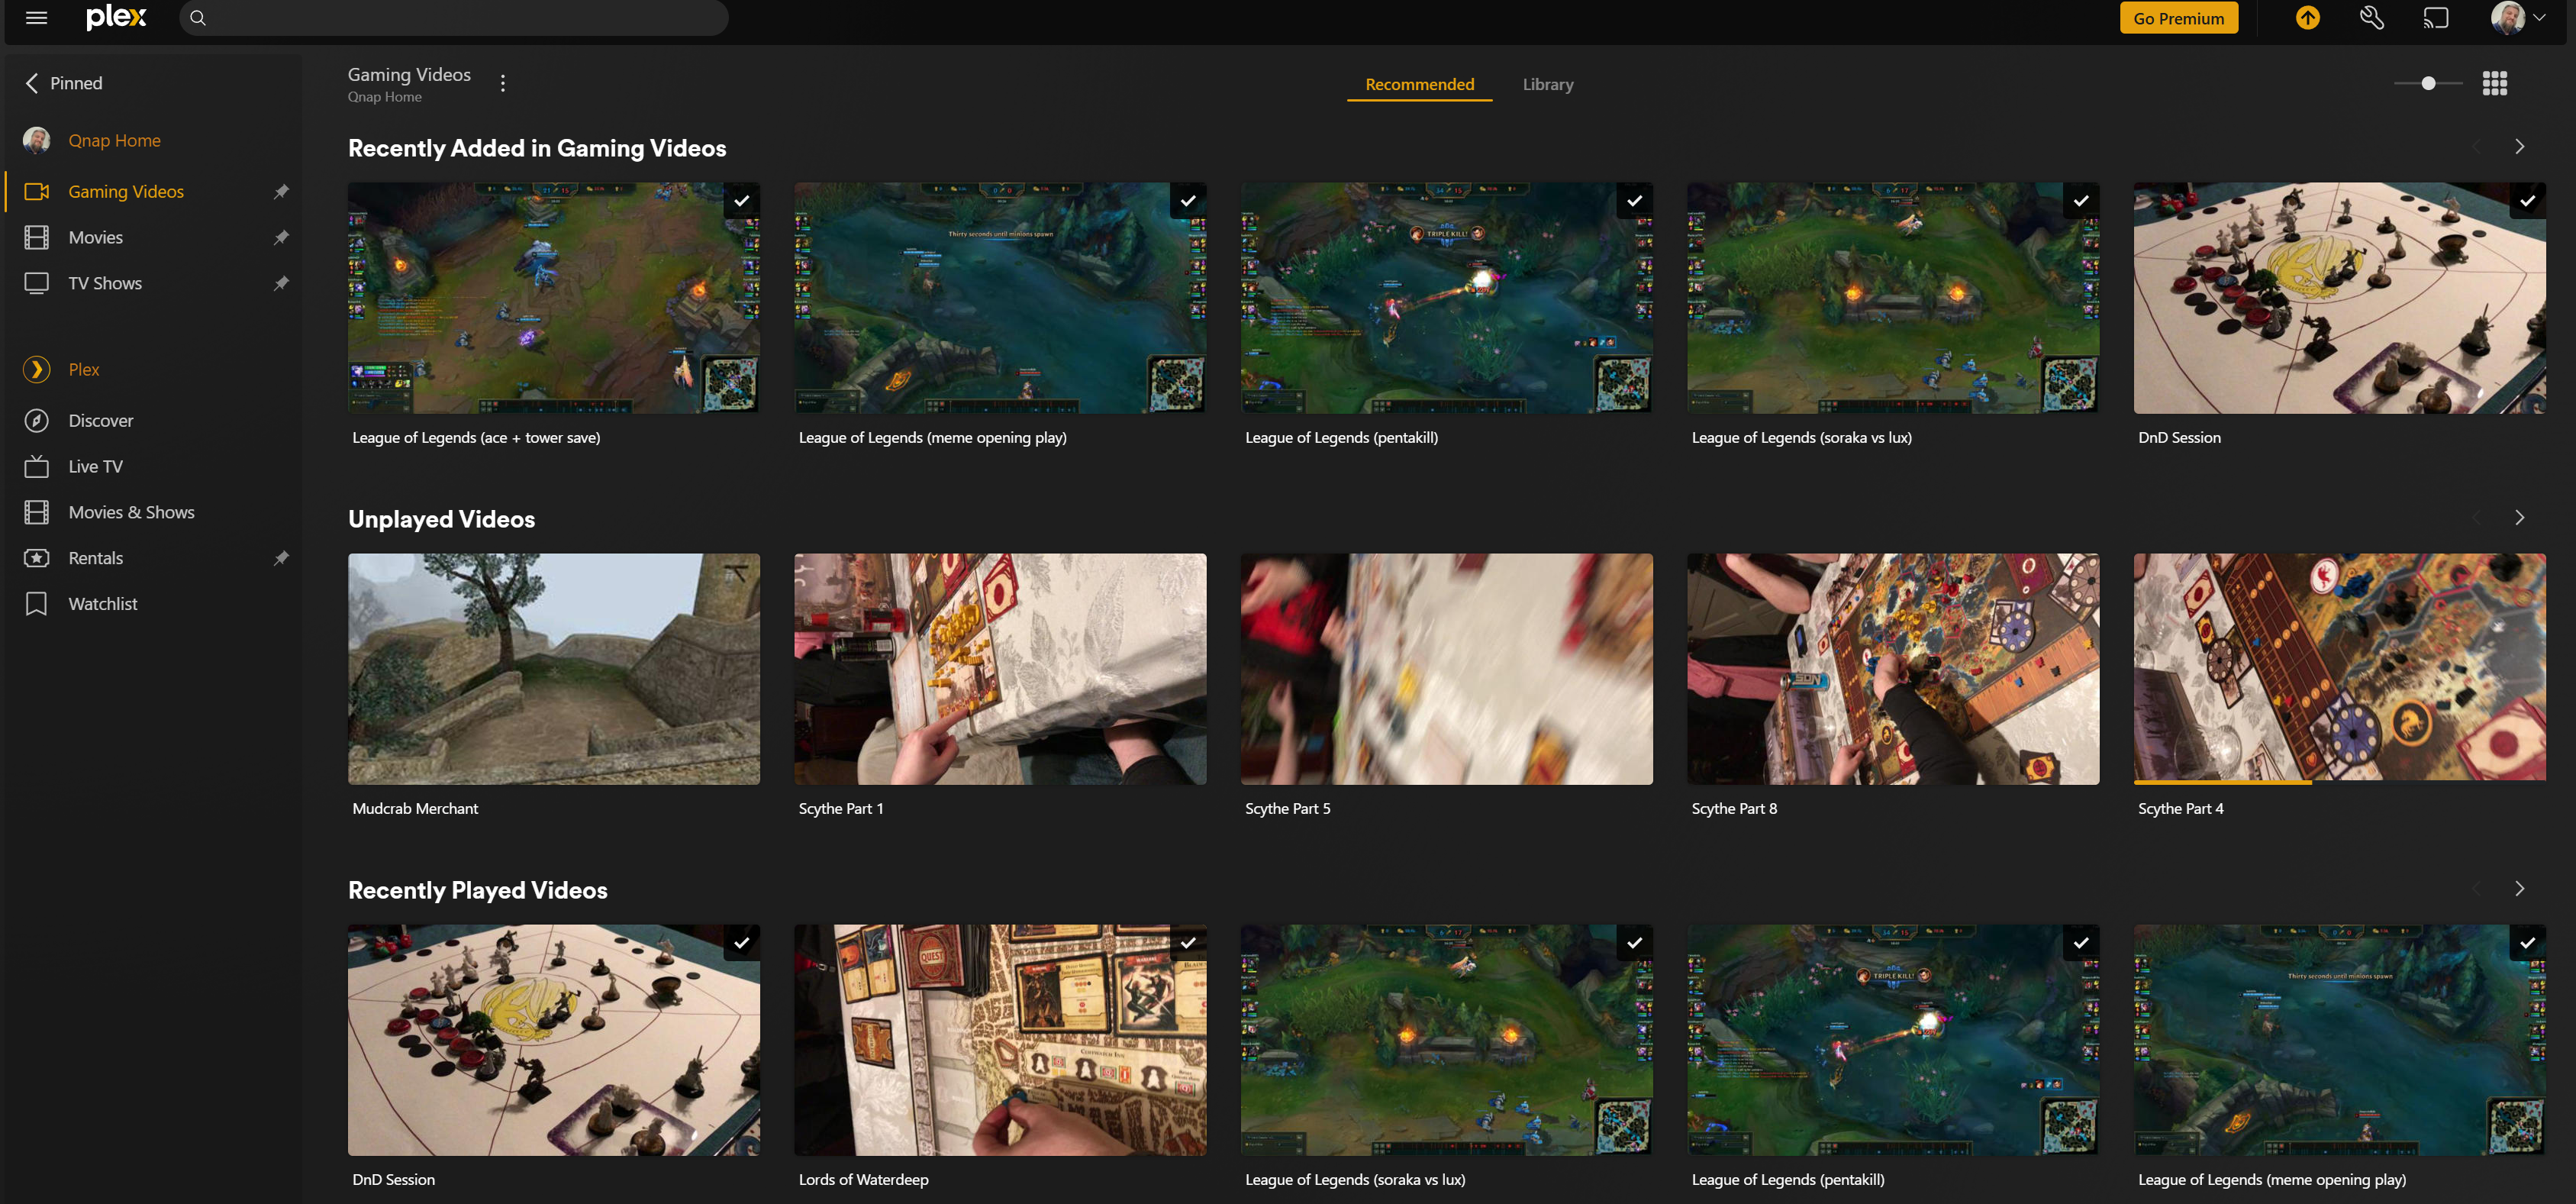
While there are better and more open media streaming services out there (such as Jellyfin), pleas is widely supported. The two smart TV’s in my house both have natively supported Plex apps, but lack support for the open source alternatives. So running Plex over these other solutions is a no-brainer.
I currently have Plex server running directly on the Qhap NAS. Why? Because the media I want to shere is there , and because there is an app for that. Qnap has built in app store, with a one-click Plex server install.
That said, this is working less than perfect as:
- my low end Qnap device has no hardware transcoding support
- the Qnap plex server app keeps crashing every few days and needs to be manually restarted
I am considering moving the plex server over to my Docker box, and exposing the media folders stored on the NAS via NFS.
Home Assistant
Home Assistant is a home automation platform. It runs as a Docker container and I threw it on my docker server.
It becomes more useful the more smart devices you have in your house. I have seen people do really crazy setups with this software, but I don’t really have that many smart widgets to worry about.

I do have a few though.
In the past I purchased some LifX devices (outlined in the next section). The major draw for these is that they just work. They connect over Wi-Fi, and can be fully configured and managed via a mobile app.
I also have a couple of Smart TV’s and few other network discoverable devices. The neat part abut Home Assistant is that it finds all of them automatically. It solves the problem I had with my smart devices.
Previously, if I had two devices by two different vendors running in my house, I had to find and install two different mobile apps on my phone, and use each of them to control the respective set of devices.
Home Assistant brings all the smart devices under one roof and allows you to program corss-platform interactions between them.
This means that I can use a ZigBee button to toggle my LifX bulbs on and off. Or set a timer dim all my variouis smart light bulbs over a specific period of time at night.
IoT Devices
Since installed Home Assistant, it’s worth talking about the smart devices I am currently using in my house.
LifX
As I mentioned previously, I already had some LifX decvices in my house. It is a pretty established band that produces a wide variety of smart devices (mostly in the lighting space). Their devices communicate over Wi-Fi, and can be configured and managed via a robust mobile app.

That said, Home Assistant has robust LifX integration and supports all of their devices out of the box. There is no setup or prep needed.
I currently run a LifX light strip as well as number or color and white bulbs around the house:
They all have been managed via the LifX mobile app thus far.
Upon installing Home Assistant, it instantly detected all my LifX devices and prompted me to add them. So far I have been able to use home assistant to program time or trigger based events that manipulate my LoifX devices with no issues.
For example, I am able to use a ZigBee remote to control my LifX lights.
Zigbee
Once I had Home Assistant up and running I got curious about home automation.
Somehow I landed on Zigbee. I guess part of this was that I did not want to put any more IoT devices on m Wi-Fi network. That said Zigbee operates in the 2.4GHz band so it’s not like I was going to avoid radio interference entirely. The other part was that ZigBee devices are cheap. Like super cheep. Sub $30 cheep.
LifX devices run up the price because they need a full Wi-Fi stack and software to join and authenticate against Wi-Fi networks. All ZigBee devices need to do is to squirt out some data in the 2.4GHz band so they can be made on the cheep.
Zigbee Gateway
To use any Zigbee devices you need some sort of a gateway/coordinator device. Fortunately for me, Home Assistant is perfectly happy to fulfill that role, provided it has the hardware to do so.
The hardware in question is this:
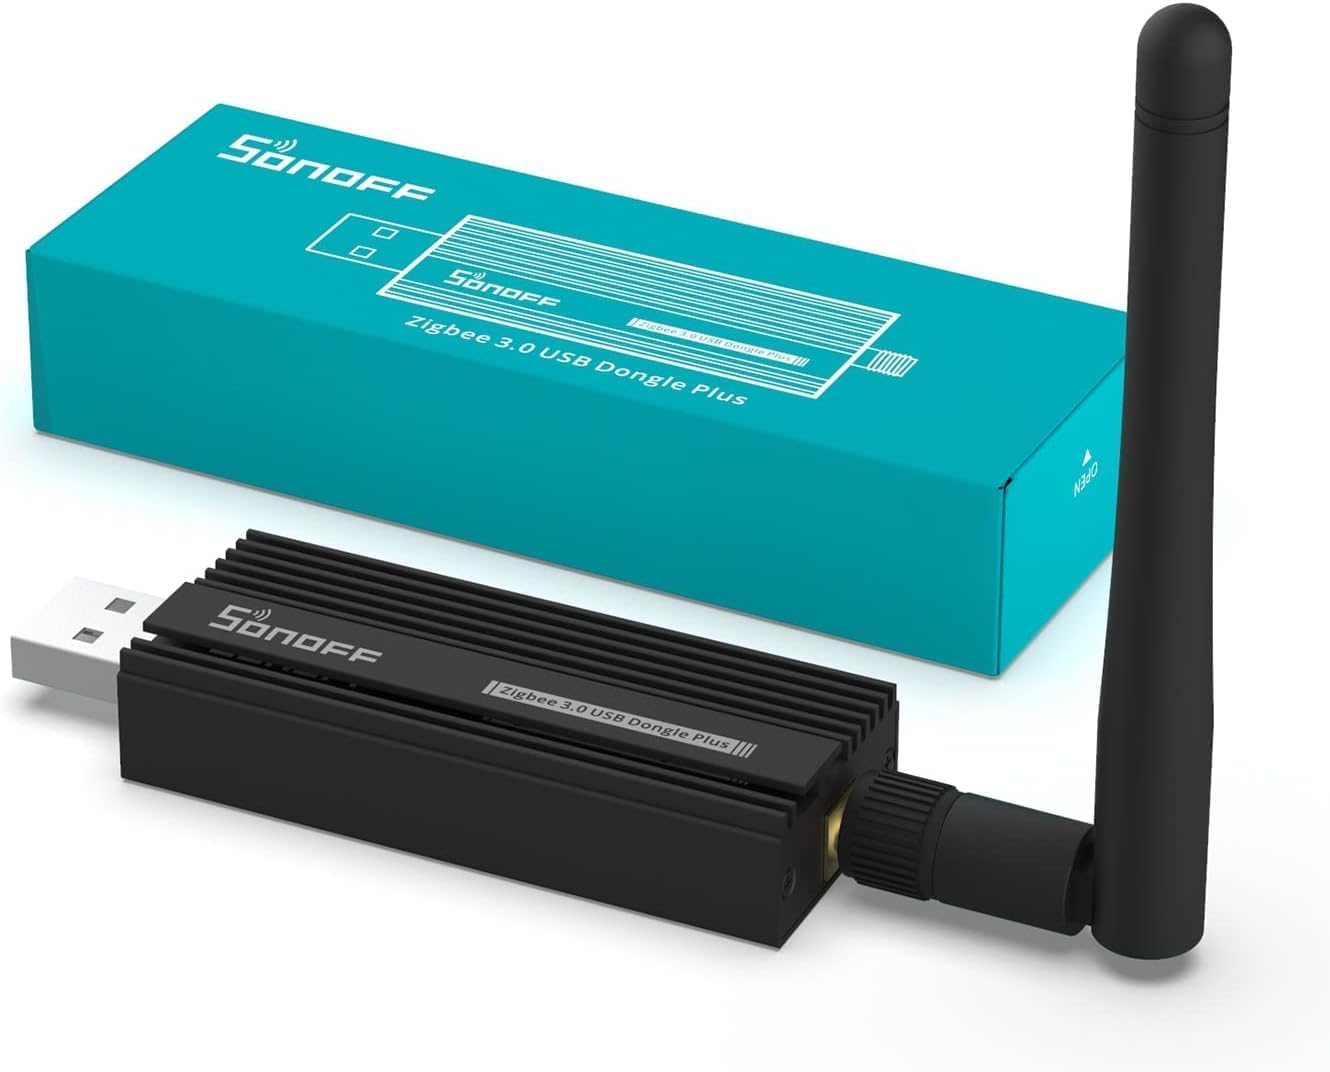
On Debian this device shows up as /dev/ttyUSB0. You just have to pass it to the Home Assistant container and it will take care ofthe rest. This can be done on the command line, in a composer file or directly in Portainer.
Since I already had a live Home Assistant instance running I went the Portainer route. I chose to Duplicate/edit the container, navigated to the Volumes section and added it there:
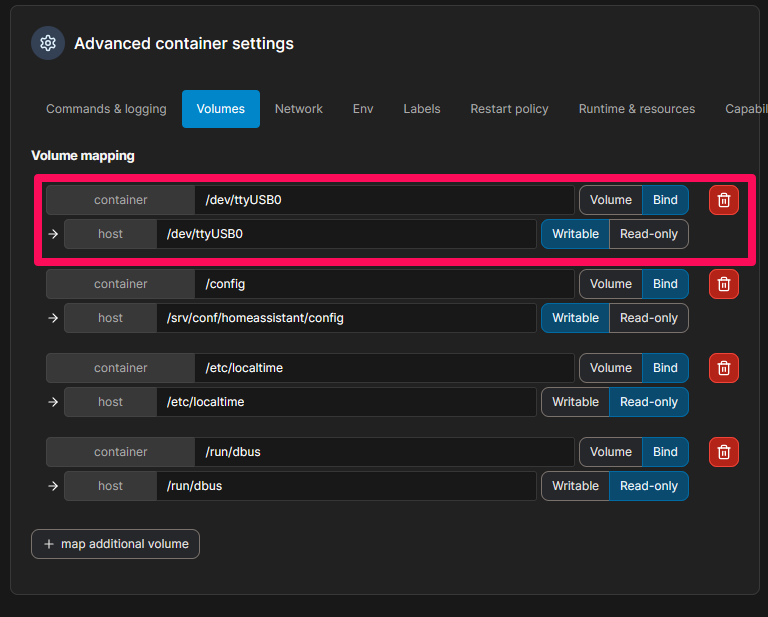
After that I just had to re-deploy the container and I was ready to add ZigBee devices via Home Assistant.
Zigbee Plugs
Some of the first ZigBee decvices I got were smart plugs. Smart Plugs make dumb devices soemewhat smart by allowing you to conntrol their powe output.
This works really well for lamps and light fixtures that take non-standard bulbs and thus can’t be outfited with smar ones.
These things seemlessly integrate with Home Assistant and are reayd to be scripted and automated out of the box. I bought a handful of the to replace my old GoSund plugs.
Quick aside: don’t buy Gosund devices. I had 4 of their plugs. Their draw was the same as LifX: they worked off of Wi-Fi and could be managed by an app. Except that the app was updated at some point, and managed to lock me out of my meticulously managed schedules.
I configured these plugs to go on and off at various times of the day via the app. When the app updated, I was no longer able to edit these schedules, but the plugs followed them nevertheless.
I contacted GoSund support and they told me to go fuck myself, factory re-set all the plugs, re-initialize them, and then re-create my schedules from scratch.
In concluson, don’t buy GoSund devices.
Zigbee Button
The other ZigBee device I bought was the remote button.
A big pitfall of smart devices is that to control them you have to:
- take out your phone
- navigate to and open an appropriate app
- navigate the app to find the device controls
- use the device controls within the app
This pales in comparison of the simple analog act of flipping a switch.
Smart buttons such as this one bring back that simplicity by generating events that can then be interpreted by software such as Home Assistant and then acted upon.
Within home assistant, I programmed this simpple, battery operated, 4-button remote to toggle various lights in my house on and off at a press of a button.
Zigbee Sensors
I also attempted to get some low price ZigBee temperature and humidity sensors. I ended up grabbing the SONOFF SNZB-02D sensors fro m Amason because they seemed to be exactly what i needed. I won’t link to them but they look like this:

Long story short, don’t buy these. They are nor compatible with Home Assistant and they don’t provide an accurate readings. Mine would join the ZigBee network with no issues but then fail to update their readings ever again.
My goal was to use these to script events, but these sensors were more than useless since they never updated.
If I ever find temperature and humidity sensors that work I will provide an update here.
Conclusions
I jokingly called the Dell Optiplex devices “powerhouses” of my home network, but as it turns out this is not a joke.
My proxmos server can run 5-6 VM’s withotout breaking a sweat, and my Docker box is running almost the entire home network automation on it’s own without any complaints.
Granted, my home network is low traffic. Most of the time it’s just me but it goes to show that low end hardware does not necessarily mean low end experience.
Engagement Bait
What do you run on your home network?
What is the docker container I should try installing next?
Do you have any legit server hardware in your house? Where do you keep the rack, and how loud is it?
How wrong am I for running Debian on all my devices, and what distro would you use instead?
What kind of smart devices do you run in your house? Am I a fool for choosing ZigBee? Am I an even bigger mark for installing LifX bulbs? Feel free to yell at me for my poor life choices in the comments.